Community Contributors
This guide has been improved thanks to contributions from the Mob Control community.
- Broly (Mob Mafia) Author and primary contributor
- draemn (Mobbin Freaks) Significant detailed critiques and improvement suggestions
- Guy Sensei Detailed critiques and improvement suggestions
- DarthVxn (Mob Mafia) Image assets
- /><\ (Mob Mafia) Space Race strategy contributions
Want to contribute? Use the feedback button to share corrections, strategies, or suggestions. You can also DM me on Facebook or Discord. Just send a friend request along with your message so it doesn't get caught in spam.
Overview
Mob Control is a mobile strategy game where players deploy mobs from cannons to defeat enemy bases and collect resources. Progression is measured by Stars (personal ranking) and Sparks (clan contribution). The gameplay loop: pick a loadout (cannon, mob, champion, ultimate), complete battles, and optimize output for the active event.
Assumptions
This guide assumes Elite Club membership, which reduces ad friction and gives easier access to multipliers. The strategies work without it, but execution takes longer.
Currencies and Progression
| Currency | Use | Notes |
|---|---|---|
| Coins | Upgrade units | Combined with Cards to level up |
| Cards | Unit upgrades | Cards + Coins = unit levels |
| Bricks | Building upgrades | Building progress yields Stars |
| Stars | Personal progression | Earned from events and building progress |
| Sparks | Clan contribution | Earned from Piggy Race, Kraken, Space Race, Rumble |
| Skip-Its | Time savers | Skip battles or preserve streaks |
Core Mechanics
Battle Flow
- Battles are the primary way you earn resources. You earn most rewards through looting.
- Battles end when the enemy base is destroyed.
- Loot is generated mostly after the base falls during the looting window. Output depends on how many mobs, champions, and ultimates you have active when looting starts.
- Ultimates and looting:
- Mass Abduction and MobCopter can be stacked on the looting area so their duration overlaps the looting window. Place them before the looting window starts.
- Rocket Barrage is best used to set up the loot window by destroying towers. It requires manual aim, so use it before the base falls instead of trying to line it up during looting.
- Rainbow Rage boosts mob damage and survivability. This can increase loot by keeping more units alive for the loot window.
- Most ultimates improve looting indirectly by stabilizing the fight or increasing how many units you keep active for looting.
Champion and Ultimate Generation
- Champion spawns are generated by shooting your cannon until the champion meter is full. More cannon shots means faster champion spawns.
- Champions killing enemy mobs charges ultimates. Champion damage alone does not count, only champion kills.
- Ultimates also charge slowly over time during the battle, even if you stop shooting.
Core Rules
These rules apply across multiple events. Individual event sections link here instead of repeating them.
- Pace rule: Some events reward speed (finish fast, repeat). Others reward prolonged battles (maximize loot). Using the wrong pace is the most common mistake new players make.
- Loot window rule: Most loot is generated after the base falls. Build champions and ultimates before that moment to maximize output.
- Flamethrower flame rule: Use flame for defense and crowd control only. Offensive use ends levels too fast and kills loot output in slow events.
- Map reroll rule: Normal levels can be rerolled by backing out and re-entering. Pinata maps cannot be rerolled.
- Multiplier gate rule: Choose gate paths based on pace. Fast events want lots of multiplication to finish quickly. Slow loot events should delay heavy multiplication until you have enough champions and ultimates, because ending the base too fast lowers loot.
- Pinata booster rule: The two core Pinata boosters are Fast Charge and x10. Your Pinata score heavily depends on your boosts. Use those two whenever you care about output. Use the other booster slots only on strong maps.
- Disclaimer: All strategies reflect community-tested observations and may change when the game updates.
Progression Roadmap
Early Game
- Gather stars to reach Immortal League and unlock better looting.
- Upgrade only the units you actually use so you do not run out of coins.
- Maintain your win streak so you keep the x2 bonus windows.
- Learn how the loot window works. Build champions and ultimates before the base falls.
Mid Game
- Build event-specific loadouts. See Loadout Library.
- Maximize resource collection to feed upgrading.
- Focus on major Star sources: Piggy Race, Space Race, Pinatas.
- Learn when to reroll maps.
Late Game
- Optimize contribution to clan events to improve rewards and sparks contribution.
- Optimize Pinata farming. Boost selection and map scouting matter.
- Expand skill with specific loadouts instead of spreading upgrades across many units.
Upgrade Priorities
Upgrade only units you actively use. Spreading resources delays progress.
Cannons
| Cannon | Use Case |
|---|---|
| Flamethrower Meta King | Daily driver for almost all modes. Reliable champion generation. See flame rule. |
| Triple | Good stopgap until Flamethrower is viable. Fast clears, sustained output. Unlocked through VIP/Elite Club. |
| Big Bertha Pinata Specialist | Best for Pinatas (fewer mobs, higher damage per mob). Also good for Kraken. |
| Railshot | Fast level clears for Pinata grinding when no major event is active (Piggy Race, Space Race, etc.). Excels at wiping out lines of enemy mobs, like a mini Rocket Barrage built into the cannon. Pair with a low-level mob to keep champions alive. Not recommended during competitive events where Flamethrower or Big Bertha outperform. |
Mobs
| Mob | Use Case |
|---|---|
| Raccoon Best for Pinata | Gets a brief speed boost going through gates, letting it race across levels quickly. Ideal for Pinatas and Kraken. |
| Knight | Prolongs battles for more champion and ultimate generation. Best for loot events. Bear is a cheaper alternative. |
| Alien | Fast mob for speed events (Space Race, general speed play). |
| Low-level mob | Keep one mob under level 30. Lower enemy damage lets champions survive longer. Works well with Great Normie and Railshot. |
Champions
| Champion | Notes |
|---|---|
| Nexus Piggy brick limit | Easiest to hit brick limit. Pair with Champion Overdrive. |
| Lootboxer Gives Stars | Only champion that directly gives Stars. Needs many clones with Champion Overdrive to max bricks. Higher skill than Nexus. |
| MobZilla Piggy brick limit | Ranged attack is great for maps with death gates. Easiest to max loot with (fewest champs needed). Slow to charge, egg form is tricky. |
| Captain Kaboom Speed / Events | Weaker brick output. Best for speed runs, World Clash, Space Race. |
| Explodon Alternate | Not beginner friendly. Fun alternate, not a main recommendation. |
| Great Normie Pre-Overdrive | Top strategy until Champion Overdrive is unlocked. Pairs with Summon Gate. Warning: too many can crash the app. |
| Sirion Pinata | Best-in-slot for Pinata levels and Kraken. |
| Starscream Lucky Battles | Best for Lucky Battles. Captain Kaboom is the fallback. Not Piggy meta. |
Ultimates
| Ultimate | Notes |
|---|---|
| Champion Overdrive Piggy brick limit | Default pairing for Nexus, Lootboxer, MobZilla. Best for most situations. |
| MobCopter | Defensive option. Great for World Clash and general survivability. |
| Summon Gate | Place before fuel gates to multiply collection. Pairs with Great Normie for pre-Overdrive strategies. Strong in Space Race and Kraken. |
| Rocket Barrage Lucky Battles | Only strong with lower level mobs. Useful in Lucky Battles for destroying enemy towers. |
Building Upgrades
Buildings provide skill points. Each building has three upgrades.
Logistics Building
| Upgrade | What it does | When to invest |
|---|---|---|
| Loot Time | Extends looting window (base 3 s, max +2.5 s = 5.5 s) | Get to 21 points, then refund to 1 point until improved multiplier reaches 35 points. |
| 4x Multiplier Size | Increases the 4x zone on the reward spinner | 1 point until you refund Loot Time, then push improved multiplier to 35 points. At 35 points, put 1 point in each Loot Time and improved multiplier as you level. |
| Teleport | Carries mobs (sometimes champions) into the next stage | Only when focusing on Lucky Battles. |
Arsenal Building
| Upgrade | What it does | When to invest |
|---|---|---|
| Super Mob | Chance to spawn a rainbow mob as an extra unit alongside normal fired mobs (not a replacement) | Exactly 1 point for general play. See Pinata Strategy for Pinata-focused splits. |
| Ultimate Boost | Improves ultimate charging, mainly through champion kills and ongoing combat | Invest after Extra Champion at roughly a 1:2 ratio (Extra Champion first). |
| Extra Champion | Chance to spawn an extra champion on deploy | Prioritize over Ultimate Boost at 2:1. Also boosts Pinata output. |
Synergy rule: Extra Champion creates more champions, which leads to more champion kills and faster ultimate charging. Ultimate Boost helps you enter the loot window with more ultimates ready. Prioritize Extra Champion at roughly 2:1 over Ultimate Boost.
Arsenal Skill Points (Pinata Focus)
The three Arsenal building skills are Super Mob, Extra Champion, and Ultimate Boost.
- Low level / general play: 24 / 50 / 25 (Super Mob / Extra Champion / Ultimate Boost). Balanced for general play outside of Pinatas.
- Max level Pinata build: 48 / 50 / 1 (Super Mob / Extra Champion / Ultimate Boost). Best Pinata-focused setting at the highest level, as observed by players.
Defense Building
Low impact. Level it alongside others, but do not stress about point allocation.
Loadout Library
Baseline loadouts for common scenarios. Adapt based on your available units.
Event Playbook
Events are the primary source of progression resources. Each section below follows a standard template. For loadout details, see Loadout Library. For rules referenced across events, see Core Rules.
Pinatas
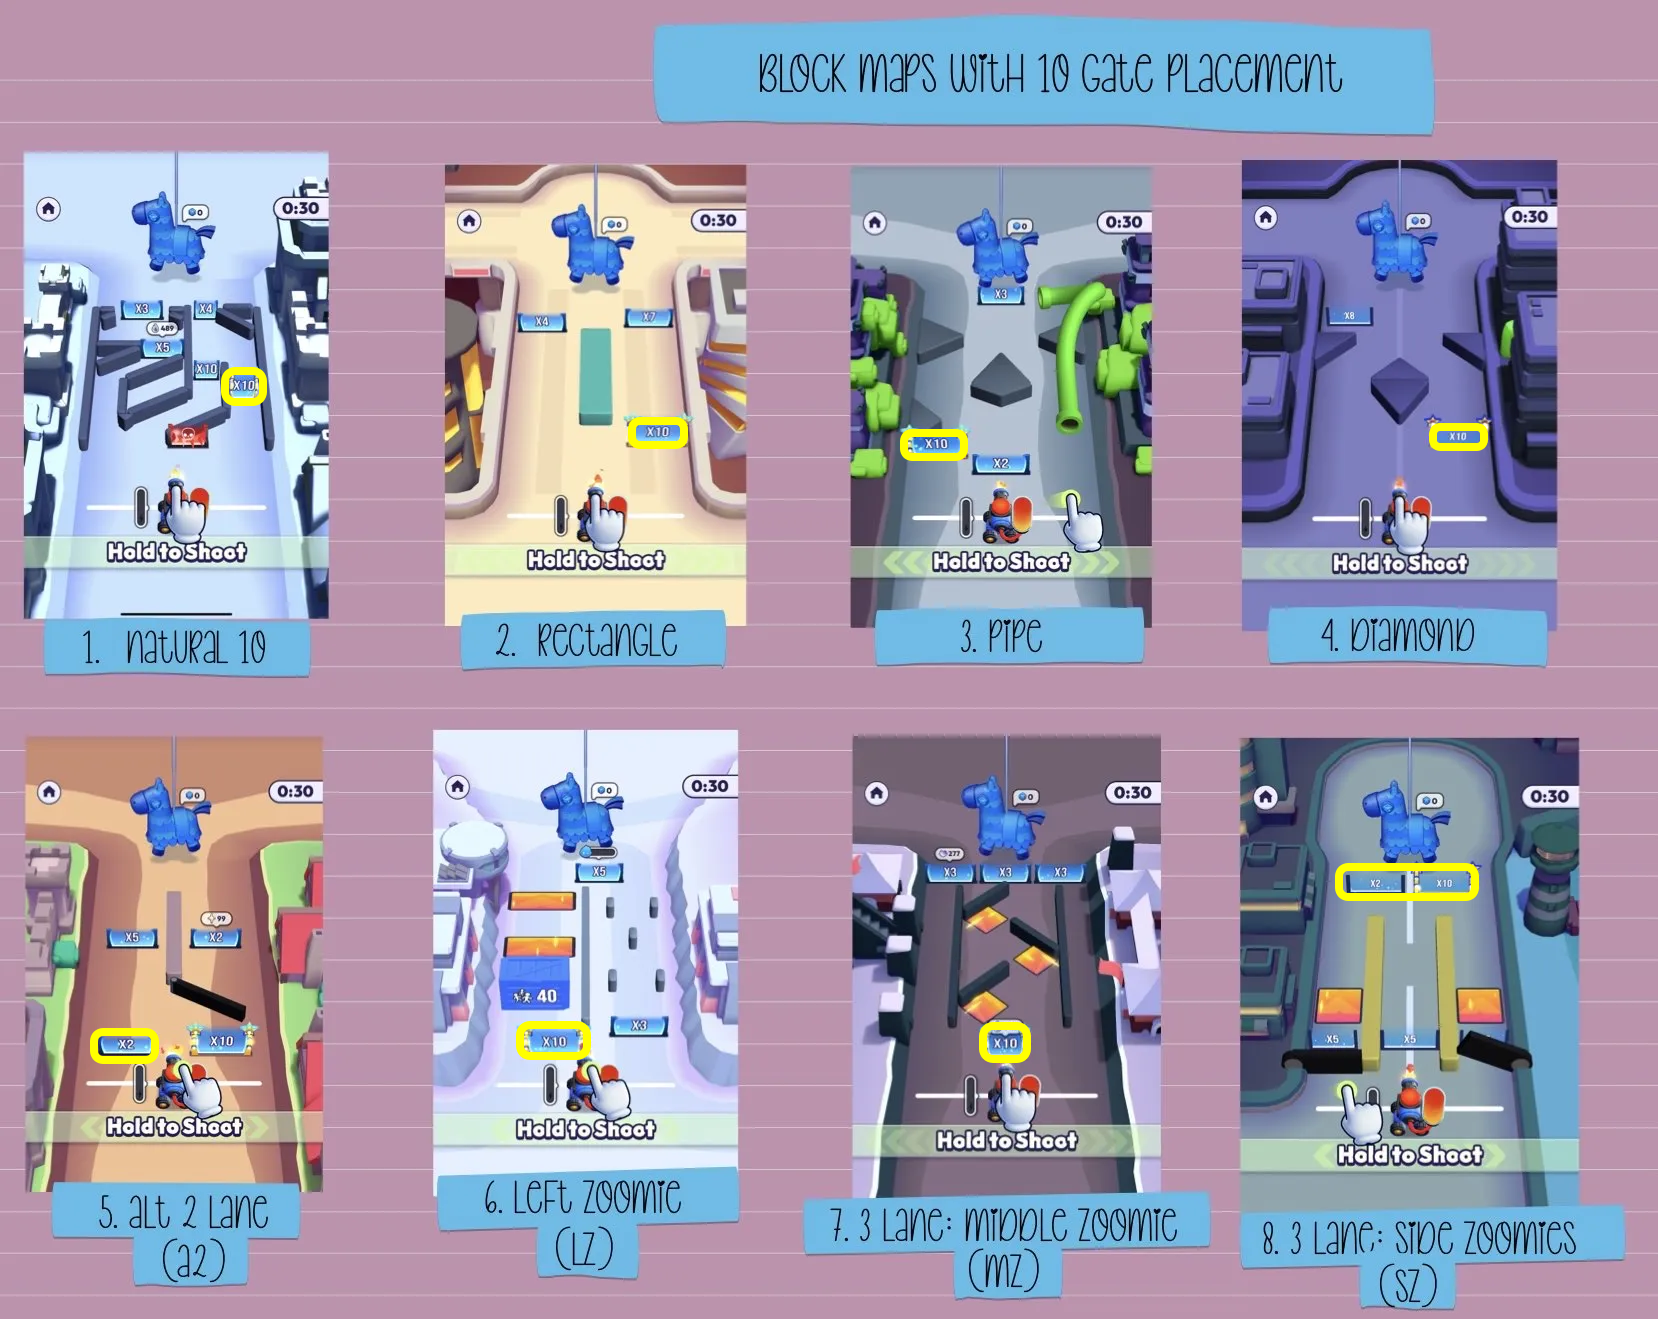
Pinata maps with optimal 10X gate locations. The highlighted gate marks the
ideal x10 target after correcting the in-game markers.
Credit: DarthVxn (Mob Mafia)
Overview
Short, fixed-duration levels that reward speed and multiplication. Types include Star, Brick, and Coin Pinatas. Ultimates are disabled. For full strategy, boosters, map scouting, and output variance, see Pinata Strategy.
Loadout
Use: Pinata Loadout (Big Bertha, Raccoon, Sirion, Fast Charge + x10).
Cadence
- Play at full aggression for the entire duration.
- Commit to the best gate path.
- Use all 4 boosters on strong maps. Save Skip-Its for Star Pinatas on high-output maps.
Mistakes
- Using slow mobs. Use Raccoon (Alien as backup).
- Treating Pinatas like normal levels and playing slowly.
- Spending boosters on weak maps.
Key takeaway: Pinatas reward speed and multiplication. See Pinata Strategy for the full breakdown.
Avatar Hunts
Overview
Seasonal, limited-time events (Spooky Hunt, Spring Hunt, etc.). Collect event tokens that spawn on the battlefield by having your mobs physically touch them. Linear progression track, 80 levels to unlock the avatar, 81+ for bonus Stars.
Rewards
- Levels 1-79: Small rewards (Coins, Cards, Skip-Its).
- Level 80: The main event avatar.
- Level 81+: Bonus Stars.
- Season Pass typically doubles rewards.
Loadout
Use fast mobs (Raccoon, Alien) and high fire-rate cannons (Triple, Flamethrower). Slow mobs win battles but miss tokens. Target Boss Levels for highest token density.
Cadence
Tips
- Watch ads during non-2x periods to bypass Hunt timers. Skip-Its have higher value elsewhere.
- Buffer strategy: if 1 token away, play a Boss Battle. Extra tokens carry over if you Skip-It immediately after claiming.
- Always check timer status before playing. Active timer = zero event progress.
Mistakes
- Playing during the cooldown timer (zero tokens collected).
- Using slow mobs that win without collecting tokens.
- Spending Skip-Its on regular chests or buildings during a Hunt.
Key takeaway: Avatar Hunts are time-gated. Watch ads during non-2x periods to progress through timers. Playing after the meter is full yields zero progress.
World Clash
Overview
Competitive event. Each round requires 9,000 bricks to win. Bricks accumulate across battles, but for efficiency you want to hit 9,000+ in a single battle so you do not need extra battles per round. Stars are only substantial for top-placement players on the team leaderboard. Not a reliable Star source for most players.
Loadout
Use: World Clash Loadout. Goal is fast, repeatable clears that consistently hit 9,000+ bricks per battle.
Cadence
- Pushing top placement: High volume of fast matches. Consistently hit 9,000+ bricks per battle to win each round in one battle.
- Casual participation: Play a few matches for minor rewards. Prioritize Piggy Race or Space Race instead.
Tips
- MobCopter provides crowd control for stable runs.
- Evaluate your team's competition level before committing heavy time.
Mistakes
- Treating World Clash as a primary Star source without top placement.
- Farming max loot instead of finishing efficiently.
- Ending battles too fast and failing to reach 9,000 bricks, forcing extra battles to finish the round.
Key takeaway: World Clash is only a strong Star source with top placement. Otherwise, spend your time on other events.
Piggy Race
Overview
Primary brick and progression event. Also a major Sparks source. Stars are prize pot and placement dependent. Stronger clans improve pot strength.
Rewards
- Stars (indirectly through bricks and progression, placement dependent)
- Sparks
Loadout
Use: Piggy Race Loadout. Beginners: Piggy Race Loadout (Beginner).
Cadence
- Play deliberately. Do not end levels early. See pace rule.
- Build champions toward brick limit each run. See loot window rule.
- Use flame for defense only.
- Position damage sources to continue hitting the base during the loot window.
- Use Counterattacks continuously during Piggy Race, not only at the end.
Tips
- Reroll maps where brick caps are hard to reach.
- Consistency and high-output sessions matter more than occasional spikes.
Mistakes
- Using fast mobs (Alien, Bat) that end levels too quickly.
- Not pairing brick-limit champions with Champion Overdrive.
- Overusing flame and ending levels early.
Key takeaway: Piggy Race output comes from brick-limit champions + Champion Overdrive + Knight to prolong battles.
Space Race
Overview
Fuel-focused placement event with two distinct goal paths. Collect fuel, then end levels quickly. Stars are tied to the prize pot and your placement. Stronger clans create stronger pots.
Goal selection
Pick your goal before you pick your loadout.
- Max distance: Use the Space Race Loadout (Max Distance). Best raw SR output. No star collection.
- Star collection + competitive distance: Use the Space Race Loadout (Counterattack). Lootboxer-generated stars often outweigh the SR placement reward. Requires a coordinated counterattack partner.
- Newer players: Use the Space Race Loadout (Beginner). Solid output without Bat, Chicken, or Lootboxer leveled.
Rewards
- Stars (placement dependent, prize pot dependent)
- Sparks
Loadout
See Goal selection above. Three loadout options depending on your goal and progression.
Cadence
- Send mobs through fuel gates immediately.
- After fuel is collected, end the level quickly. See pace rule.
- Reroll poor maps.
- Do not farm extra loot once fuel is capped.
- Play as fast as possible between battles. Close all popups immediately. Skip post-battle looting animations where possible. Wasted seconds compound across hundreds of battles.
Tips
- Place Summon Gate before fuel gates to multiply fuel.
- Coordinate with your clan to raise the pot.
- Fuel Stacking: Save Counter-Attacks/Revenges (3x reward battles) for when the 2x Fuel window is active. This stacking can jump billions of fuel in minutes.
- Counterattack partners: When SR allows counterattacks, partners become the real throughput bottleneck. Partners can drop off without warning. Volley coordination matters. Chicken is easier on partners than Bat (small distance sacrifice).
Mistakes
- Playing Space Race like Piggy Race (dragging fights out).
- Using slow mobs.
- Ignoring fuel gates.
- Wrong loadout for your goal. Max Distance with Lootboxer collects fewer stars. Counterattack without a reliable partner wastes the loadout's strength.
- Slow pace between battles. Popups and looting animations eat hours over a full event.
Key takeaway (goal): Pick your goal before your loadout. Max Distance, Counterattack, and Beginner serve different outcomes. Lootboxer star output often beats SR placement rewards on its own.
Key takeaway (pace): Speed between battles is the multiplier. Close popups immediately, skip wasted seconds, and treat fuel collection as the start of each battle, not the goal.
Kraken
Overview
7-day clan boss event with two phases. Days 1–6: complete Clan Missions to make tickets available, then manually claim them (unclaimed tickets are lost). Day 7: the Kraken boss fight unlocks for one day and you spend your tickets to battle it. Clans with the most damage win unique rewards.
Rewards
- Sparks
- Event-specific rewards
Loadout
Use a stable, high-survivability loadout. Big Bertha is strong here (high per-mob damage). Summon Gate is a good ultimate. Avoid fragile speed builds.
Cadence
- Days 1–6: complete Clan Missions daily and manually claim your tickets. Unclaimed tickets are lost.
- Day 7: the boss fight unlocks. Spend all your tickets during this single-day window. Don't miss it.
Mistakes
- Skipping Clan Missions or forgetting to claim tickets; fewer tickets means less damage on fight day.
- Missing the day-7 fight window entirely, wasting all earned tickets.
- Using fragile speed builds that fail before dealing meaningful damage.
Key takeaway: Complete every Clan Mission and claim your tickets during the challenge phases so you enter the boss fight with maximum tickets. On fight day, optimize your loadout and timing for maximum Sparks per ticket.
Rumble
Overview
Rotating event format featuring a specific unit. Primary value is the free Skip-Its. 1st place earns two Skip-Its. Stars earned are minor.
Loadout
Use the featured unit. Build around its strengths (speed, damage, crowd control). Choose supporting units that stabilize the run.
Cadence
- Match your pace to the scoring. See pace rule.
- Learn whether scoring counts damage, kills, time, or completions.
- Participate at least once for the free Skip-It. Aim for 1st place to earn two.
Mistakes
- Playing the wrong pace for the scoring.
- Skipping participation and missing free Skip-Its.
Key takeaway: Rumble is primarily valuable for free Skip-Its (two for 1st place). Stars earned are minor.
Lucky Battles
Overview
Participation event with luck-based mechanics. Primary value is free Skip-Its. Direct rewards are minor.
Loadout
Use: Lucky Battles Loadout.
Cadence
- You earn more Skip-Its per round, maxing out at round 17.
- Playing beyond round 17 is not recommended for reward efficiency.
Mistakes
- Over-investing time expecting major rewards.
- Skipping participation and missing free Skip-Its.
Key takeaway: Lucky Battles is primarily valuable for free Skip-Its. Do not over-invest time.
See Loadout Library for two Lucky Battles loadouts, including a tower-destruction Rocket Barrage setup.
Pinata Strategy
Pinatas are one of the highest-variance reward opportunities in Mob Control. This section is the canonical reference. The event accordion links here.
Core Principles
- Pinatas are short, fixed-duration levels that reward speed and multiplication.
- Types include Star Pinatas, Brick Pinatas, and Coin Pinatas.
- Ultimates cannot be used in Pinata levels.
- Multiplier gates create the biggest output swings. Stopping the spinner can be learned.
- Special gates that increase mob damage are also advantageous.
Loadout and Boosters
Use the Pinata Loadout. See Pinata booster rule for booster details.
- Use all 4 boosters on strong maps.
- Spending Skip-Its on boosters is most advisable for Star Pinatas on high-output maps, for Brick Pinatas only during Piggy Race on favorable maps, and is not recommended for Coin Pinatas.
Map Scouting
Pinata maps cannot be rerolled (see map reroll rule). Scout the map before committing boosts. Poor maps with unfavorable gate positions may not be worth premium investment.
Each Pinata map has a single 10x gate. Fish for it by backing out and re-entering until the x10 boost lands on that gate, then run the level. The highlighted gate in the reference image marks the corrected ideal target to boost.
Execution
- Go all out for the full duration.
- Commit to the best gate path.
- Use fast mobs (Raccoon, Alien as backup).
- Sirion is the most consistent Pinata champion.
Output Variance
| Factor | Impact |
|---|---|
| Map quality | High (gate availability and path efficiency) |
| Multiplier timing | Very High (multiplying with many mobs vs. few) |
| Mob speed | High (faster = more hits in fixed duration) |
| Unit levels | Moderate (less impactful than execution) |
Clan Contribution and Sparks
Sparks are the clan contribution metric. Competitive clans track spark output and expect consistent participation.
Key Principles
- Focus Sparks contribution on Piggy Race and Space Race (most consistent output events).
- Communicate with clanmates about timing and bracket targets.
- Steady participation beats sporadic spikes for placement.
Why Strong Clans Matter for Stars
Race Stars are prize pot dependent. Strong clans raise pot strength through higher combined output. Treat race placement as part of your Star progression.
Contribution Events
| Event | Spark Potential | Notes |
|---|---|---|
| Piggy Race | High | Output-focused. Correct cadence required. Stars are pot and placement dependent. |
| Kraken | Highest | Clan boss. Can reward more sparks than any other event. Consistency matters. |
| Space Race | High | Speed-focused. Clan coordination beneficial. Stars are pot and placement dependent. |
| Rumble | Low | Primary value is free Skip-It. |
Common Mistakes
| Mistake | Consequence | Fix |
|---|---|---|
| One loadout for all events | Suboptimal output everywhere | See Loadout Library |
| Ending loot events too fast | Reduced brick and champion output | See pace rule |
| Playing speed events too slow | Reduced fuel or efficiency | See pace rule |
| Upgrading unused units | Wasted coins and cards | Upgrade only what you actively use |
| Overusing Flamethrower flame | Accidentally shortens battles | See flame rule |